
Follow this step-by-step video on how to set up your meeting link so customers and prospects can book meetings with you.
Prefer to read vs watch? No problem, you can read through the steps below
Connecting Your Email
First off, note that a Sales Seat is required if you want to connect your calendar for round robin and group meeting link scheduling.
For individual calendar, you just need to be a user in anyone's HubSpot account with access to their Sales Hub - Starter, Professional, Enterprise accounts.
Go to Sales tab, then Meetings - if your calendar is not yet connected, you'll see a light yellow box at the top with the option to 'Connect Calendar' -- click the button.
Choose which email client you wish to connect (Gmail, Microsoft Outlook, or Microsoft Exchange).
**In most cases, you'll want to have 'Turn on Calendar Sync' checked. If you're an existing HubSpot user and have contacts in HubSpot that you have had meetings with in the past or moving forward, these activities will be pulled as meetings in your HubSpot account.
Once you have accepted Terms and Conditions and allowed connection to Google (or Microsoft), choose which email address you want connected.
Your email should now be connected, and you should no longer see the light yellow box at the top of the page.
Now that your email is connected, it's time to setup your meeting link
HubSpot will automatically create a default link for you - you can edit the existing settings to set the preferences to yourself (recommended).
Or you can create a net new scheduling page for yourself - you'll have three options:
-
- One-to-One
- Group (requires a paid Sales Seat)
- Round robin (Requires a paid Sales Seat)
For this video, we'll be editing the existing meeting link.
Click the Edit button (shown below).

Now you have the Overview of your meeting link, fill out the fields accordingly.
-
- For Location, if you use Zoom, Teams, or anything other than Gmail, your Zoom administrator will need to connect the Zoom app.
- For Gmail users, a Google Hangouts meeting link will automatically be added within the invite.
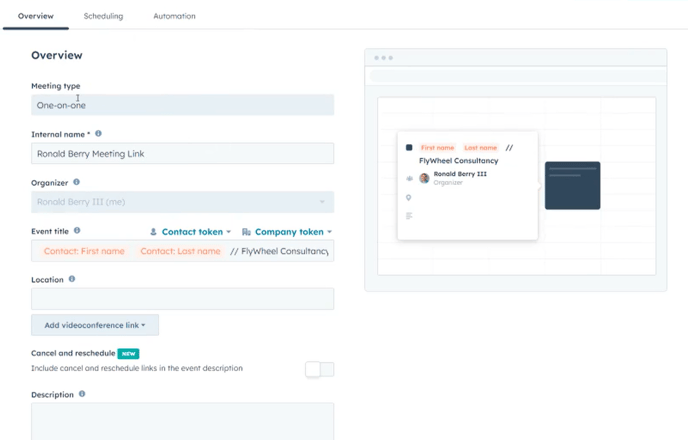
Don't forget to hit Save when you're done!
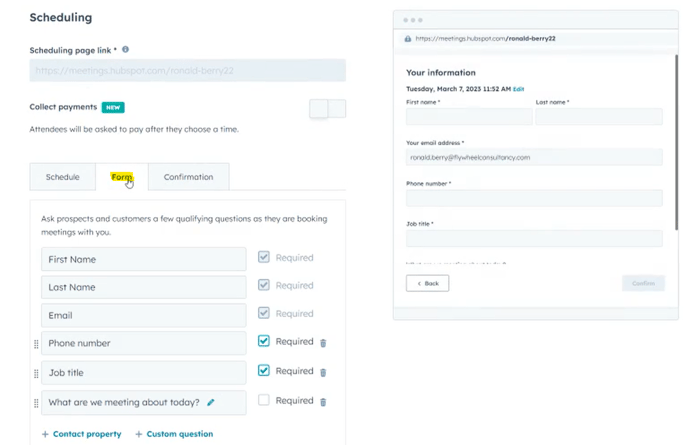
Now, go to the Scheduling tab at the top (next to Overview).
-
- This is where you can outline your specific availability options/limitations for when people book a meeting with you.
- For a complete walkthrough of this section, go to time stamp 5:45 of the video.
- Save your changes!
Now go to the Form tab - this is where you can prompt certain questions (First/Last Name & Email will automatically be asked).
-
- You can add contact properties and/or custom questions (i.e. phone number, job title, etc. and/or "What are we meeting about today?").
- Option to turn on CAPTCHA
- For business outside the U.S like Europe, be sure to turn on GDPR -- if you want, you can customize the terms & conditions for consent.
-
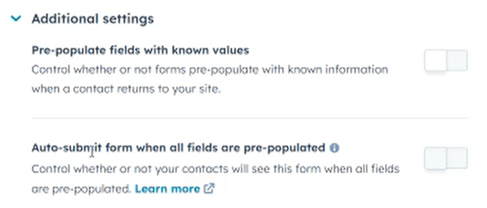
- Don't forget to go through Additional Settings
- Recommended to turn off Pre-populate fields with known values and Auto- submit form when all fields are pre-populated
- Hit Save
- Don't forget to go through Additional Settings
Now, go to Confirmation tab (next to Form) and choose whether you want to display a default confirmation page, or if you want to redirect them to another page.
-
- I recommend to Redirect to another page on your website, as it will drive additional traffic to your site, it's more personalized to your brand, and provides a better user experience.
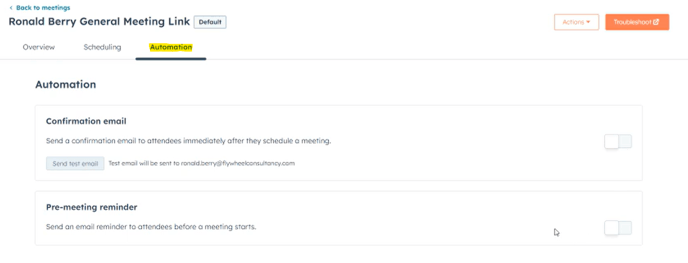
Lastly, go to Automation tab on top of page
-
- Users will automatically receive the invite sent to their calendar, so I recommend leaving the Confirmation email off.
- You can also ad pre-meeting reminders if you wish -- currently, you cannot customize what the reminder looks like.
- Save
Congrats, you have now finished setting up your meeting link!
You can access your meeting link anytime in a couple of ways:
-
- Clicking Actions (top right button w/ orange outline) > Copy Link
- Going back to Sales Hub at the top > Meetings > hover over meeting link and click Copy Link

**You can also create multiple meeting links if you want a specialized link aside from your general link, such as qualification calls, demos, groups (requires Sales Seat), round robin (requires Sales seat), etc.